Pages

Wednesday, February 23, 2011

Snickers Pie

In celebration of my husband and the month of his birth, I made Martha Stewart's version of a Snickers Pie.  It's not technically a Snickers Pie because it doesn't have a nougat center but a peanut butter mousse.  As a lover of peanut butter and chocolate, this pie is not to be missed.  

The recipe seemed easy overall with it's cookie crust and an easy mousse.  The only part that I approached with apprehension is the caramel.  I've never made candy let alone caramel from scratch and my sister-in-law insisted I needed a thermometer even though the recipe didn't called for it.  I just sucked it up, read the recipe as carefully as I could, and began.  The recipe called for 1 and 1/4 cup of sugar and 1/4 cup of water.  I was to put it over medium heat until the sugar caramelized.  That sounded easy enough.  However, I did this 3 times and it just did not work!  The water evaporated and left the sugar in a hard white lump.
a slow boil
nothing but hard, dry sugar
I cooked in in medium heat, slow heat, high heat, but to no prevail.  I ended up resorting to Youtube videos of other chefs making a caramel sauce.  I found these videos to be particularly helpful: video 1, video 2, and video 3.  I noticed in these videos that it was simply sugar in the pot, no water necessary.  The sugar over low heat, will slow begin to caramelize on it's own.
Starting to melt


Just use the pan to move the sugar around, no utensil needed


wait for it...


Wait for it..


Smooth!
The only thing to be careful about is not to leave it on the stove for too long because even though it will look the right color and texture, the sugar will begin to burn and there is no way to remove the burned taste and you'll have to start all over.  Once the sugar is melted, take it off the heat and add a liquid such as cream or butter.  This will shock the sugar and harden it.  Put back over heat and the sugar will warm to a nice thick sauce.  This particular recipe added creme fraiche to the caramel and I think it lessened the sweetness and gave it an even creamier texture.


Adding the creme fraiche
After this step, I was spent and didn't have enough time to cool the pie before serving.  It takes about an hour to cool and form.  The chocolate ganache is supposed to be a thick layer on top so be sure it sets before releasing the springform.
Released the springform before the chocolate could set
Despite my lack of patience, the pie was still tasty and looked even better the next day!  I was very happy to learn a new technique and I will definitely make this pie again!


Friday, February 18, 2011

Farm Fresh to You

8
Ta-Da! So excited!
I have been looking into CSA's for a long time but it took a Groupon to get me signed up for Farm Fresh to You.  I have been very interested in gardening and eating in season but just don't have access to a garden to plant fruits and vegetables of my own.  My interest in local agriculture peaked after reading the Omnivore's Dilemma and a couple of books about Alice Waters.  When I lived on the East Coast I realized how lucky I was to be from California where most things can grow all year long.  Those long Boston winters were hard to endure as I saw tomatoes so pale they were almost white and high priced produce from far away lands.  Joining Farm Fresh to You is my way of support the local farmers and being cognizant of eating what is in season.
Cauliflower, avocados, potatoes, oranges, and lemons
Farm Fresh to You is a great service because there is a program for everyone.  They make it really easy with no commitment necessary.  There is no contract and deliveries happen as often as once a week to once every four weeks.  The size of the deliveries also vary with small, medium, and large sizes.  If you go out of town you can cancel a delivery or if you have a party you can have additional produce shipped.  You can also exclude items you don't like, but trying new fruits and vegetables is part of the fun!  Yes, it is a little bit more pricey than a regular grocery store but it is local, organic, and delivered to your doorstep.  
Nothing finer!
I ordered the regular mixed box for $31 a delivery.  I received everything pictured.  It was so easy and the produce was really fresh, even with fresh dirt on the lettuce.  If you end up with something in the box you've never cooked with before, there are plenty of recipes for the fruits and vegetables on their website.  
Lettuce, carrots, beets, collard greens, kale, cilantro
Eating well and supporting local farms means a lot to me and it's also a great opportunity to try new ingredients and learn to cook with what is in your refrigerator.   I highly recommend the service!

Thursday, February 17, 2011

February Daring Cooks Challenge: Cold Soba Salad and Tempura

The February 2011 Daring Cooks’ Challenge was hosted by Lisa of Blueberry Girl with recipes courtesy of Globetrotter Diaries and about.com-Japanese food.

I was excited about this challenge because I love Japanese food and I have a great market nearby where I could find some of the more exotic ingredients.  
Some of the ingredients
Soba Noodles
12 oz of Soba Noodles
2 liters water

In a large stock pot, bring water to a boil.  Add the noodles and bring back to a boil.  Add 1 cup of cold water.  Bring back to a boil and add another cup of cold water.  Check for tenderness, noodles should be firm yet tender.  Drain in a colander and run cold water over the noodles.  Drain and put a damp kitchen towel over them until they cool completely.

Dipping Sauces
There were two options for sauces and I chose to do both!  I am an admitted salt lover and I wanted to try both.  I liked one sauce significantly more than the other because the green onions added such flavor and the sauce had a nice kick.

Spicy Dipping Sauce
The idea behind soba noodles is to slurp the noodles by taking the noodles and dipping them into the sauce.  A great recipe is defined by the delicious dipping sauce.  Slurp slurp!  

Spicy Dipping Sauces

3/4 cup finely chopped green onions
3 tbsp soy sauce
2 tbsp rice vinegar
1/2 tsp sugar
1/4 tsp English mustard
1 tbsp vegetable oil
1 tbsp sesame oil
salt and pepper to taste

Traditional Dipping Sauce
2 cups dashi stock
1/3 cup sodium
1/3 cup mirin

The traditional sauce didn't suit my fancy but I love green onions and the spicy one hit the spot.  Dashi was very difficult to find and I think the particular brand I got just wasn't that good.  The spicy sauce was made with ingredients I usually have in my pantry.  I used hot chinese mustard instead of the powder because that's what I had on hand.  I think it was a nice substitution.

The tempura was just as easy as I thought it would be.  I decided to keep it simple and use carrots, bell pepper, green beans, and mushrooms.
The vegetables
Tempura Batter

1 egg yolk
1 cup ice water
1/2 cup flour
1/2 cup cornstarch
1/2 tsp baking powder
oil for frying
ice water bath for bowl of batter

Add egg to water and beat.  Add dry ingredients and beat until loosely combined.  The recipe says the batter should be lumpy but I felt mine was so watered down.  I ended up dipping the vegetables  in the batter and then coating it with panko crumbs.  I also found the batter to be a bit bland and would add some salt next time.  I know that usually the tempura is dipped in a sauce but I sometimes just like to have the tempura on it's own.   Overall, the meal was easy to make but I think the recipes need some fine tuning for next time.  I will try the batter again to see if I can get it thick enough to forgo the panko next time.  I enjoyed this recipe because it was a type of cuisine I love but also very simple to make.

Tuesday, February 8, 2011

Cheesecake Lollipops with Bacon

For the Superbowl, my friend Neil has a big party where he gets a taco guy to serve authentic Mexican food to your hearts content.  It's an awesome affair and aside from chips and dips, I wanted to make something that didn't compete with Mexican food and could win over meatheads everywhere.  I saw this recipe and thought I would put a little spin on it and cover my cheesecake with dark chocolate and an assortment of toppings.  I rolled them in bacon, Heath Bar, sprinkles, or salt.

So yummy!
The recipe is a fairly simple cheesecake, baked and rolled into balls.  I have never made a cheesecake before but it seemed pretty simple.  If I were to make a real cheesecake, I probably would not use this recipe because it wasn't the best I've ever had but once it's covered in chocolate and bacon, it's less about the cheesecake.  Use your favorite cheesecake recipe (or have a little help from the store).

Not the prettiest cheesecake I've ever seen
You can use a cookie scoop to make balls of cheesecake and put a lollipop stick on top.  Freeze for at least 30 minutes.  This is important because the balls will be frozen and will help the chocolate to harden.


Once frozen it's easy to dip in chocolate and cover in your favorite toppings.  I highly recommend the bacon as it's that sweet and salty goodness in the perfect size bite!  The Heath Bar was also delicious, as are most candies that are hard enough to stick to chocolate, unlike a gooey candy like a Snickers Bar.  I would recommend the salt but only very very sporadically, too much will throw off the flavor of the cheesecake.  The sprinkles were just my nod to the team I was supporting that day.  Go Packers!


Saturday, February 5, 2011

Kale Chips

I picked up some kale for my Zuppa Toscana and had a bunch left over.  I love dark leafy greens and I usually saute them in olive oil and garlic for a quick and easy side dish.  I didn't want to do the same old routine with the kale so I tried baking them so they become crispy, like a chip.  They turned out so delicious!  They are versatile too, they can be eaten like chips, as a side dish, or crumbled on top of a meal for a crunchy and earthy bite.  For this particular night's meal, we made salmon tostadas and laid the kale on top for even more crunch.

I wash and dried the kale, remove the stems, and cut them into chip size pieces.  I put them on a cookie sheet with parchment paper and drizzled olive oil and soy sauce.  You can use salt instead of soy sauce if you'd like.  Tossed the kale and threw it in the oven at 350 degrees for about 10-15 minutes.  They will turn a little brown on the edges and that is when you know they are done.  Take them out mid way through cooking to turn them a bit and that's it.  So easy and delicious!


Friday, February 4, 2011

Julia Child's Boeuf Bourguignon or Boeuf a la Bourguignonne

My love of Julia began when I read the book "My Life in France" which was written in collaboration between Julia and her great-nephew Alex Prud'homme.  Part of my love of Julia is because she didn't even start cooking until she was 38.  She took classes while living in France and it was her passion and dedication to food, particularly french cuisine, that helped her to become a culinary icon.  She was by no means young when she began her culinary career and her cookbook took 9 years to get published.  I think of her when I start to think it's too late for anything new and exciting in life.  The best is yet to come!
first edition 1961
I have zero experience with cooking french food unless you count the number of french onion soups I have slaved over in my lifetime.  Boeuf bourguignon seems synonymous with French cuisine and of course Julia .  I have had the first edition of her cookbook since 2007 (a gift from my wonderful husband) and I haven't really had the guts to open it.  Part of the reason is that it's so detailed and not one of those books one can open on a weeknight and expect to prepare a meal.  It takes some thoughtful planning and reading to feel prepared to make one of her dishes.  This doesn't go to say that once one has thoroughly read the recipe that it is time consuming to attempt.  I'm sure some can be, but I found the bourguignon fairly simple and quick if you don't factor in the time it takes while in the oven.

Boeuf bourguignon is essentially a beef stew.  It has bacon, onions, carrots, and mushrooms, and of course stew beef.  Julia's recipe takes an extra 2 steps by browning the onions and mushrooms separately.  It is very typical of a trained chef to cook vegetables separately and this is where I found the recipe to be the most time consuming.  However, the results are not to be missed!  Following Julia's recipe for browned onions, I got small white onions and browned them in butter and oil for about 10 minutes.
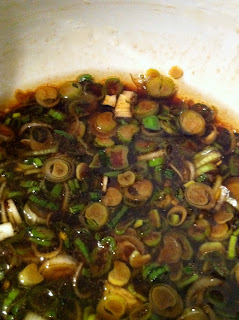
18 small white onions in butter and oil

Then I added a half cup of red wine (chianti), an herb bouquet consisting of thyme, parsley and bay leaf, put a lid on and simmered.
simmering with chianti

Yum-o!
Oh so delicious!  Very flavorful and I'm now considering making the onions again and turning them into a jam.  The mushrooms were to be saute with a little butter and oil but I don't think this step of cooking them separately from the stew added anything to this dish.

With these two steps done, I tackled the stew.  It begins with the bacon.  The recipe calls for a slab of bacon but since I didn't have access to a nice butcher that day, I used 6 oz. of regular bacon.
Take the bacon out and in the same fat brown the stew beef.  Remove the meat and add the carrots and onions.
Once the vegetables are cooked, add the beef and bacon back into the dutch oven.  Add the wine and beef stock along with the herbs and salt and pepper.  Once it's boiling, it's ready to be put in the oven for 3-4 hours.

I made butter peas per Julia's suggestion as well as roasted parsnips because she suggested potatoes and parsnips are very similar.  I served it with a Beaujolais wine as also suggested by Julia.  The recipe calls for straining the fat for the gravy but I skipped this because there really was very little fat to skim.  i also added an extra carrot because I just can't get enough of carrots.  Once the bourguignon is finished in the oven, add the onions and mushrooms to the pot.  Scoop a big spoonful of the meat and vegetables onto a plate and add the gravy on top with parsley for garnish.

I'm really pleased with how this turned out.  As with all stews, it tasted even better the next day.  I'm not so sure what I was so nervous about but the end result is not daunting and extremely delicious.  I hope I made Julia proud, but no matter because I was proud of myself.