Pages

Sunday, October 3, 2010

August Daring Cooks Challenge: The World of Pierogis

I always say it's better late than never and it couldn't be more true for the August Daring Cooks Challenge. The August Challenge was hosted by LizG of Bits n' Bites and Anula of Anula's Kitchen. We explored the wonderful world of pierogi with it's many versatile names and fillings.

Essentially every culture has some sort of dumping. Whether fried, steamed, or baked, I cannot find anything wrong with a delicious filling encased by my all time favorite food group, carbs. We all had to use the same dough recipe and choose our fillings based on our locale.

Dough Ingredients
2 to 2 1/2 cups all purpose flour
1 large egg
1 teaspoon salt
About 1 cup of lukewarm water

The dough was pretty easy as I just put the flour on a surface, created a well, added an egg, and started mixing from the inside out.

Add salt and water slowly until the consistency is smooth and firm yet soft enough to roll out to 1/8". Once formed, put in a bowl and cover with clear wrap. Let it rest for 20 minutes. Once it is rolled out, you could buy an inexpensive form to create the shape or you could use a round cookie cutter, put filling in the middle, fold in half and pinch the edges.
I used a fork to press down on my edges and that worked quite well. As you can see I was experimenting with size a little bit and I think I went with the medium size. Once the piergois are formed, boil a pot of water seasoned with salt. Boil the piergois until they rise to the surface. Remove with a slotted spoon and taste to see if ready. It can now be eaten as is or I like to fry mine up with a little butter.

My filling wasn't necessarily inspired by my locale. I wanted to try another recipe I had seen on the Martha Stewart show. It is the very common filling of cabbage and cream cheese.

Cabbage and Cream Cheese Filling
2 3lb heads of cabbage with their outside leaves removed
8 oz Cream Cheese at room temperature
Salt and Pepper

The cabbage needs to be finely chopped and steamed until soft and with a slight crunch. The cabbage must be drained before adding the cream cheese. This was the hardest part as cabbage does tend to soak up a lot of water. Use a thin kitchen towel and squeeze as much out of it as you can. Mix the cream cheese and season with salt and pepper to taste.
I thought the piergois were actually really delicious and very easy to make. I whipped some up for dinner and they've really inspired me to make an asian version of the dumping very soon. Stay Tuned!

Sunday, July 25, 2010

Inspiration


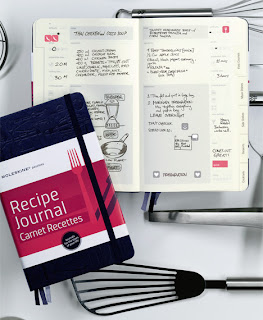
There are two things I love in life, notebooks for jotting down inspiration and my husband. The latter gave me this great recipe journal from Moleskine as one of my anniversary gifts. I use Moleskine for everything and it's become quite the obsession. I love the embosssed leather cover, the expandable folder in the back, the ribbon markers, the easy to sort tabs for appetizers, side dishes, first course, main dishes, desserts, and cocktails. Included is a food calendar and six tabs to be personalized. I can't wait to start using it!

Monday, July 19, 2010

July Daring Cooks Challenge: Cooking with Nut Butters

The July 2010 Daring Cooks’ Challenge was hosted by Margie of More Please and Natashya of Living in the Kitchen with Puppies. They chose to challenge Daring Cooks to make their own nut butter from scratch, and use the nut butter in a recipe. Their sources include Better with Nut Butter by Cooking Light Magazine, Asian Noodles by Nina Simonds, and Food Network online.

This is my first Daring Cooks challenge and I could not be happier with the topic! At home I am never without nuts. My husband and I are runners and he is a triathlete and we are always looking for ways to incorporate the great nutritional value of nuts in a way other than simply consuming a handful. Nuts offer protein, energy, potassium, iron, calcium, lowers bad cholesterol, and so on and so forth. Any type of nut can be used, cashew, peanut, almond, pecan, hazelnut, the list goes on! Nut butters actually do not contain any butter. Oil can be added if the desired consistency is smoother. In which case the oil can be the corresponding nut oil, or a light vegetable oil. The nuts can be roasted first in the oven and salt can be added to taste. Making your own really cuts down on costs and you are in total control of how much oil and salt to use (if any) and all you need is a food processor.

The challenge is to use the nut butter is a savory dish. I chose to make Chicken with Curried Tomato Almond Sauce. The first step is to make the almond butter. Almond butter is so delicious and usually quite expensive at the grocery store. The recipe calls for 1/3 a cup of almond butter. That means I had to use 2/3 cup of almonds. I simply roasted the almonds for about 10 minutes in the oven and then put it in the food processor for about 5 minutes.
It looks chunky and like it will never start to form a paste, but keep going and it will end up looking like this:


Ingredients:

1 Tablespoon (15 ml) olive oil

4 (6 oz / 170 g) boneless, skinless chicken breast halves

Salt to taste


Spice Blend:

1.5 tablespoons (20 ml) garam masala seasoning

1 teaspoon (5 ml) ground ginger

1/2 teaspoon (2 ml) ground cinnamon

1/4 teaspoon (1 ml) black pepper


Sauce:

4 tablespoons (60 ml) butter

1 large onion, cut in half pole to pole

2 cloves garlic, minced

1 (15-ounce/425 g) can tomato sauce

cup (80 ml) almond butter

cup (80 ml) milk

½ to ¾ cup (120 to 180 ml) chicken broth or water, more as needed

1 cup (240 ml) frozen peas (optional)


Hot basmati rice for serving

Chopped parsley (optional garnish)

Sliced almonds (optional garnish)


Directions:

1. Cook the chicken. If desired, pound chicken to ¼ inch (6 mm) thickness to promote even cooking. Sprinkle with a bit of salt and pepper to taste. Heat 1 teaspoon (5 ml) olive oil a large nonstick skillet over medium-high heat. Add half the chicken; sauté 3 to 5 minutes on each side or until cooked through. Cook the chicken in 2 batches, adding more oil if needed for second batch. Dice chicken into bite-sized pieces; set aside on clean plate and keep warm.

2. Prepare spice blend. Stir garam masala, ginger, cinnamon, and pepper together in a small bowl. Set aside.

3. Melt the butter in large nonstick skillet over medium-low heat. Add the onion and cook gently for several minutes to infuse the butter with onion flavor. Keep the heat low to avoid burning the butter; a little color is fine. Add the spice blend and garlic and cook for 1 minute or till fragrant, stirring constantly. Add the tomato sauce, stir well, and bring to boil. Reduce heat to simmer. Whisk in almond butter and milk until thoroughly combined with tomato sauce. The almond butter is thick so it takes a while to make a smooth sauce. Return to simmer. Add broth (or water) to sauce to reach desired consistency; return to simmer. Add more broth (or water) as needed to thin sauce as desired.

4. Remove onion from sauce and discard. Stir frozen peas (if using) into sauce. Transfer sliced chicken to sauce. Simmer gently for a few minutes until peas and chicken are heated through.

5. Serve chicken and sauce over rice. Garnish with chopped parsley and/or sliced almonds if desired.


Notes on the recipe:

You can use any protein, I ended up using half chicken and half shrimp. For the spice blend, Garam Masala seasoning can be hard to find but I was able to locate it at Whole Foods on the shelf with all the other dry seasonings. Garam Masala is an Indian spice blend consisting of black pepper, cardamom, cinnamon, cloves, cumin, and coriander. If you can't find it, there are recipes online on how to make it at home. I also used fresh ginger instead of ginger powder. As for the onion, I wanted to leave it in the recipe so instead of cutting it from pole to pole, I brunoise the onion and kept it in with the butter and garlic. I definitely added chicken broth because after the almond butter was added it was very thick. I think I added about half a cup but it could have used more. I also prefer my curry with a little more of a kick to it so next time I may add so jalepeno but adding Sriracha did the trick, I mean, what doesn't taste better with Sriracha?

This was really a delicious recipe and the almond butter was a great way to thicken up a sauce! I think it will have to end up in our regular weekly rotation.


Friday, May 14, 2010

Celebration


Over the past two years, pretty much ever since I started this blog, life has been changing at speeds I'm unaccustomed to. I'm trying to take it all in stride and maintain a positive attitude. Some days and situations can get me down and I think today I just really needed to celebrate something.

I have never baked a regular cake before, like a made from the box cake, just not from the box. I've made flourless cakes and unusual cakes but never just a standard chocolate cake with a buttercream frosting. I wanted to try to make a multi-layer cake and frost it to try some techniques I've seen and heard. I searched cookbooks and television shows and the internet before I landed on a recipe from epicurious.com. I chose it because it had coffee in it for depth of flavor and also buttermilk which I love. The buttercream frosting also came from epicurious and it was absolutely delicious although very buttery. In the future I may decide to use a different buttercream recipe to use less butter but this one was very delicious with the cake.


Double Chocolate Layer Cake

Ingredients:
3 ounces fine-quality semisweet chocolate such as Callebaut
1½ cups hot brewed coffee
3 cups sugar
2½ cups all-purpose flour
1½ cups unsweetened cocoa powder (not Dutch process)
2 teaspoons baking soda
¾ teaspoon baking powder
1¼ teaspoons salt
3 large eggs
¾ cup vegetable oil
1½ cups well-shaken buttermilk
¾ teaspoon vanilla

  • The recipe called for a 10 x 2" cake pan but I used a 9" x 1.5" and it turned out fine. I made three cakes so I just weighed the batter and then divided it by 3. That way I knew each cake would have the exact amount of batter.

    Preheat oven to 300°F. and grease pans. I greased the sides first with butter then added the wax paper on the bottom and greased that as well. You could add a little cocoa powder at the bottom to further ensure the cake comes out from the pan cleanly.
  • Finely chop chocolate and in a bowl combine with hot coffee. Let mixture stand, stirring occasionally, until chocolate is melted and mixture is smooth.
  • Into a large bowl sift together sugar, flour,cocoa powder, baking soda, baking powder, and salt. In another large bowl with an electric mixer beat eggs until thickened slightly and lemon colored (about 3 minutes with a standing mixer or 5 minutes with a hand-held mixer).
  • Slowly add oil, buttermilk, vanilla, and melted chocolate mixture to eggs, beating until combined well. Add sugar mixture and beat on medium speed until just combined well.
  • Divide batter between pans and bake in middle of oven until a tester inserted in center comes out clean. Bake for 35 mins and upward until toothpick is clean.

    Cool layers completely in pans on racks. Run a thin knife around edges of pans and invert layers onto racks. Carefully remove wax paper and cool layers completely. Cake layers may be made 1 day ahead and kept, wrapped well in plastic wrap, at room temperature.

    Vanilla Buttercream
    • 4 large egg whites at room temperature for 30 minutes
    • Rounded ¼ teaspoon salt
    • 2/3 cup water
    • 1⅓ cups plus 2 tablespoons sugar
    • 4 sticks (2 cups) unsalted butter, cut into tablespoon pieces and softened
    • 2 teaspoons vanilla

      • This recipe begins two fold, making a simple syrup and beating the egg whites. Do not start beating the egg whites until the syrup reaches a boil.

        Combine whites and salt in a very large bowl or stand mixer.

        Stir together water and 1⅓ cups sugar in a 3- to 4-quart heavy saucepan until sugar is dissolved, then bring to a boil over moderate heat, without stirring, brushing any sugar crystals down side of pan with a pastry brush dipped in water.

        When syrup reaches a boil, start beating egg whites with an electric mixer at medium-high speed until frothy, then gradually add remaining 2 tablespoons sugar and beat at medium speed until whites just hold soft peaks. (Do not beat again until sugar syrup is ready.)

        Meanwhile, put thermometer into sugar syrup and continue boiling until syrup registers 238 to 242°F.
      • Immediately remove from heat and, with mixer at high speed, slowly pour hot syrup in a thin stream down side of bowl into whites, beating constantly. Beat, scraping down side of bowl with a rubber spatula, until meringue is cool to the touch, about 10 minutes in a standing mixer or 15 with a handheld. (It is important that meringue is properly cooled before proceeding.)
      • With mixer at medium speed, gradually add butter 1 piece at a time, beating well after each addition until incorporated. (Buttercream will look soupy after some butter is added if meringue is still warm. If so, briefly chill bottom of bowl in a large bowl filled with ice water for a few seconds before continuing to beat in remaining butter.)


        • Continue beating until buttercream is smooth. (Mixture may look curdled before all of butter is added but will come back together by the time beating is finished.) Add vanilla and beat 1 minute more.

          When the cakes are cool and the buttercream is ready, it is now time to assemble the cakes. If you have one, use a cake stand. Cover the stand with pieces of parchment paper, maybe use about four pieces that you can easily remove out from under the cake. The parchment paper will stop the buttercream from sticking to the cake stand and it can be easily removed once you are finished frosting.

          To get the cake layers ready for frosting, brush off any crumbs. Make the each layer is level and if not shave some off with a knife. Place the first layer on the parchment covered stand. Frost the top and place the second layer on. Repeat until you are done with layers. Once the cake is assembled cover the top and the sides with a minimal layer of frosting, just enough to cover all the surfaces. Place cake in the fridge for about 30 mins to harden the frosting. This will make it easier to frost the rest of the cake if there is already a harden surface to spread the remaining frosting. Frost as much as you like and you can either make it smooth or a more creamy look. And ta-da hopefully you will have a delicious and beautiful cake.